Basic GEMM Operator Example
Overview
This example demonstrates how to implement a basic GEMM operator using PTO and expose it as a PyTorch operator via torch_npu.
Supported AI Processors
- A2/A3
Directory Layout
demos/baseline/gemm_basic/
├── op_extension/              # Python package entry (module loader)
├── csrc/
│   ├── kernel/                # PTO kernel implementation
│   └── host/                  # Host-side PyTorch operator registration
├── test/                      # Minimal Python test
├── CMakeLists.txt             # Build configuration
├── setup.py                   # Wheel build script
└── README.md                  # This document
Operator Description
Function
This example implements GEMM with fixed dimensions [m, k, n] = [512, 2048, 1536]:
Where:
Ashape:[512, 2048](m × k)Bshape:[2048, 1536](k × n)Cshape:[512, 1536](m × n)
Specification
| Item | Value |
|---|---|
| OpType | gemm |
| Inputs | a: m×k, float16, ND; b: k×n, float16, DN |
| Output | c: m×n, float, ND |
| Kernel name | gemm_basic_custom |
Tiling Parameters
The validation platform has 24 cores. The workload is split across cores (prioritizing splitting m and n) using a 4 × 6 grouping: split m into 4 parts and n into 6 parts to fully utilize 24 cores.
Per-core shape:
singleCoreM = 128,singleCoreK = 2048,singleCoreN = 256
Because the per-core tile still exceeds L0 capacity, k is further tiled into base blocks of size 64. The base block is:
baseM = 128,baseK = 64,baseN = 256
| Parameter | Value |
|---|---|
m |
512 |
k |
2048 |
n |
1536 |
singleCoreM |
128 |
singleCoreK |
2048 |
singleCoreN |
256 |
baseM |
128 |
baseK |
64 |
baseN |
256 |
Implementation Notes
Type definitions
The implementation defines matrix representations for GM, L1, and L0, then assigns backing storage for tiles. Example (simplified):
using NDValidShapeA = TileShape2D<U, baseM, baseK>;
using NDsingleCoreShapeA = BaseShape2D<U, M, K>;
using GlobalDataSrcA = GlobalTensor<U, NDValidShapeA, NDsingleCoreShapeA>; // A in GM (ND)

using NDValidShapeB = TileShape2D<U, baseK, baseN, Layout::DN>;
using NDsingleCoreShapeB = BaseShape2D<U, K, N, Layout::DN>;
using GlobalDataSrcB = GlobalTensor<U, NDValidShapeB, NDsingleCoreShapeB, Layout::DN>; // B in GM (DN)

using NDValidShapeC = TileShape2D<T, baseM, baseN>;
using NDWholeShapeC = BaseShape2D<T, M, N>;
using GlobalDataOut = GlobalTensor<T, NDValidShapeC, NDWholeShapeC>; // C in GM
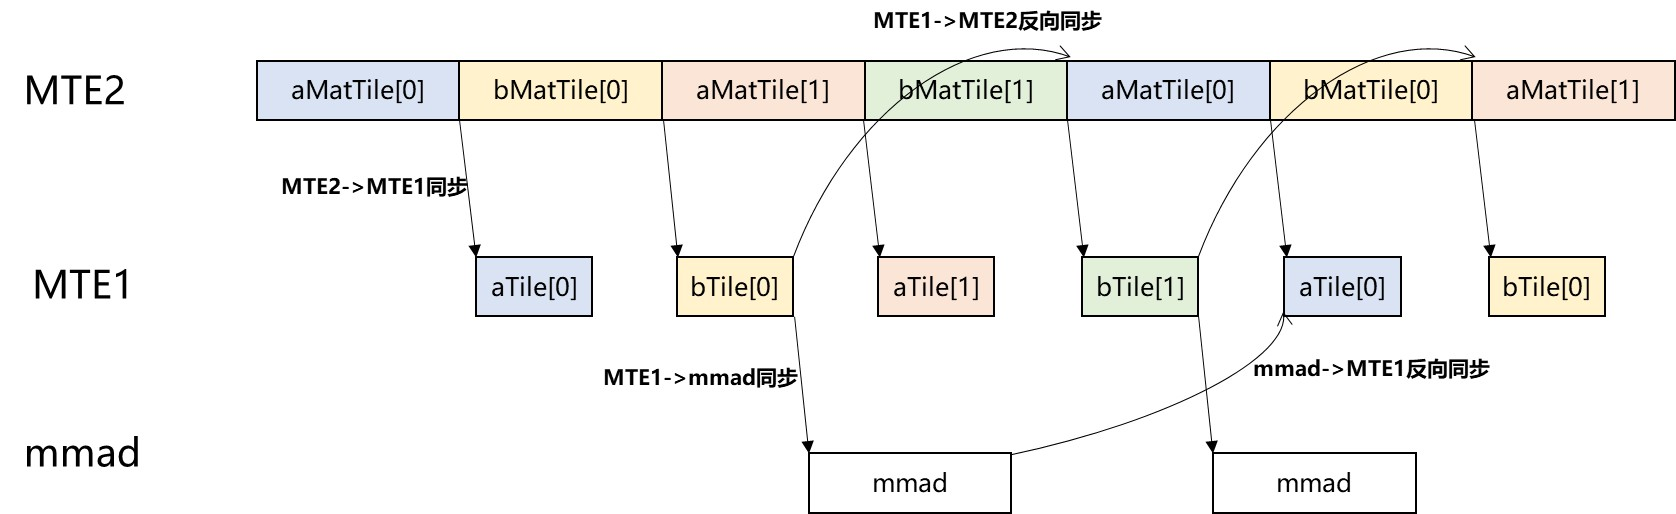
Pipeline scheduling
This example overlaps data movement and compute using double buffering in L1 and L0 to improve utilization. Synchronization points ensure correct dependencies, including:
- Forward sync:
MTE2 -> MTE1,MTE1 -> MMAD,MMAD -> FIXPIPE - Reverse sync:
MTE1 -> MTE2,MMAD -> MTE1
Pipeline overview:
Build and Run
1. Prepare the python environment
Create your own virtual environment and install the required python package.
python -m venv virEnv
source virEnv/bin/activate
python3 -m pip install -r requirements.txt
2. Configure environment and build the wheel
export ASCEND_HOME_PATH=/usr/local/Ascend/
source ${ASCEND_INSTALL_PATH}/bin/setenv.bash
export PTO_LIB_PATH=[YOUR_PATH]/pto-isa
rm -rf build op_extension.egg-info
python3 setup.py bdist_wheel
3. Install the wheel
pip install dist/*.whl
4. Run the example
cd test
python3 test.py